14 December 2012

 
Happy Friday!
 
I did these nails last weekend for a night out.  I originally wanted to use black and gold over a nude base, but ended up just using gold, and I'm so pleased with how it turned out!


(I'm afraid this is the best picture I could manage. Meh).
 
I started off with three coats of Ciaté My Fair Lady. On my pinkie I added a row of studs from the Born Pretty store. On my ring finger I added a coat of Nails Inc Fleet Street (HOW gorgeous?!). On my middle finger I added a stamp using Barry M Gold Foil and a stamping plate from the Born Pretty store (m57). I actually stamped the same image twice, back to back, which worked quite well except I didn't let my base dry enough and dented it :/ And finally on my pointer finger I used the cling film technique, again with Barry M Gold Foil.
 
I've never worn a skittle mani before and I really loved wearing this! 

11 December 2012

Barry M Mint Green and Aqua Glitter

 
Hello :)
 
Glittery nails today yayyy!  For this look I started off with two coats of Barry M Mint Green.  Then using a striping brush I added random segments of Barry M Aqua Glitter. 


I finished off with some silver striping tape and a coat of Cult Nails Wicked Fast.
 
Simple but quite effective I think!
 
~


6 December 2012

Roses are red...

 
Hi! It's nearly the weekend, yay! 
 
 
Today's nails are rather unseasonal, but what the hell.  Thought I'd mix it up a bit!
 
I started out with two coats of an unnamed Nails Inc polish (it came with a magazine an age ago) and added some flowers with a dotting tool.


For the middle of the flowers I used China Glaze Electric Pineapple.  The other colours are :
China Glaze Papaya Punch
Barry M Raspberry
Revlon Sweet Tart
MUA shade 1


28 November 2012

Pretty & Polished - Apple of My Eye

 
Hi!  Quick post today...
 
Today's post is the third and final (sob) of my recent Pretty & Polished purchases.  This is Apple of My Eye, a pretty green glitter polish with several different sizes and shades of green glitter.


This is one coat of Apple of My Eye over two coats of Rimmel Black Cab, with a coat of Cult Nails Wicked Fast top coat.  As you can see one coat gives great coverage. 


I'll definitely be wearing this one again over Christmas :) 

23 November 2012

Pretty & Polished - Hearts & Daggers

Happy Friday!
 
This is the another of my recent Pretty & Polished purchases, Hearts & Daggers. 
 
I love this glitter so much! Red hearts, black diamonds, black and white hex and bar glitters and iridescent micro glitter. To be honest, I was expecting application to be quite fiddly, but it wasn't at all. I had to fish out a couple of hearts but had no problems at all otherwise.


It took me a while to decide what colour to wear this over. I wanted something that would compliment it and not detract from it. I finally decided on Nails Inc Elizabeth Street. This is two coats of Elizabeth Street and two coats of Hearts & Daggers, with a coat of Cult Nails Wicked Fast top coat.


Have a great weekend :)


16 November 2012

Pretty & Polished Libra Scales

Evening!
 
Today I have one of my first purchases from Pretty & Polished!  This is Libra Scales, a beautiful blue jelly glittery polish.


Libra Scales is a blue jelly base filled with different sized and shaped blue glitter, with some square silver glitter.  It's like a glitter sammich in a bottle :D


These pics are three coats of Libra Scales.  I needed two coats of Cult Nails Wicked fast top coat to smooth it out.  Even though it's packed with sooo much glitter, application was a breeze.  It's so pretty!!
 
I'll have a couple more posts featuring Pretty & Polished over the next week or so :)


15 October 2012

At Last - Max Factor Fantasy Fire

 
So I know this polish is kind of old news, but it took me a LONG time to get my hands on it and I LOVE it, so no way am I not writing a post about it!!


Gah it's just so good.  There is primarily a reddish/bronze shimmer to this polish, but moving my hands under the light I can see green, yellow, gold, orange, even a hint of blue. 


I tried my best with these pictures, and (for me) they came out pretty well, but they still don't quite do this polish justice.


I love how Fantasy Fire looks layered over this dark blue shade, but there are so many other colours I think it would look gorgeous over.  This one will definitely be making another appearance!


11 October 2012

Clingfilm/Saran Wrap Nails!

 
Hellooo, I'm back!  Yay!
 
Today's post is my first attempt at the clingfilm/clingwrap/saran wrap or whatever you want to call it technique! 


This is two coats of China Glaze Papaya Punch with a coat of Gold By Giles Red on top, and a coat of Cult Nails Wicked Fast Top Coat.


I love the kind of marbly effect this gives!  And it's really quite easy to do, although I do recommend having your clingfilm pieces cut and ready to use before you start painting to avoid messing up your nails! 


I'm really pleased with how this turned out.  I love these colours together too - reminds me of fire :)
 

18 August 2012

Cult Nails - Let Me Fly


So about a week and a half ago I placed my first order with Cult Nails, and today it arrived in the post! Yay! I ordered a couple of polishes and Wicked Fast, a fast drying top coat. 

This is Let Me Fly, a beautiful turquoise polish with silver shimmer.


This is two coats of Let Me Fly and a coat of Wicked Fast. 


Application was super easy, the formula is perfect.  I love Wicked Fast too - true to it's name it dries really quickly and it's nice and thin too which I like.  I've had so many problems with gloopy, thick top coats so it was a joy to use this one!!

I'd also like to add how impressed I was with the service and speedy delivery - there were 9 working days from me placing my order to receiving my polishes, and that's delivery from the US to UK!  Highly recommend paying a visit to the Cult Nails site!


5 August 2012

Look At The Shiny Shiny!! Nails Inc Royal Arcade


Hi!  Happy Sunday!  I'm having a lovely relaxed day watching the Olympics :)

Today's post is another awesome polish from Nails Inc.  Royal Arcade is the blue glitter from their Nail Jewellery range.  Here it is layered over Rimmel Black Cab.


This is two coats of Black Cab, two coats of Royal Arcade and a top coat of Essie Good to Go.


Royal Arcade is just gorgeous, and a dream to apply.  I had to fish out some of the largest bits of glitter, but only on a few nails.  I love this look! 

I'm loving glitters at the moment so you'll probably be seeing much more Glittery Goodness over the next week or two!

31 July 2012

Could It Be Magic...? Take Two

Quick post - Midtown Magic from my last post, mattified!


I'd been wearing MM for a day before these pictures, hence a bit of tip wear.  So, I added a coat of ELF Matte top coat.  Not sure how I feel about the end result to be honest...


I was hoping the glitter would show through a bit more.  And to be honest, I don't rate ELF's Matte top coat.  I've used it a couple of times now and at first is fine, but it seems to wear off if you wear it more than a few hours, and not just at the tips as you would expect, I mean the whole nail.  After a day or so you end up somewhere between matte and shiny.  Not so good!


29 July 2012

Could It Be Magic...?


Just a quick swatch post today!

This is a gorgeous China Glaze polish that I picked up for a about £3 in a bargain bin, and I loooooove it!!  It's called Midtown Magic.


MM is a black/brown base with gold, red and green shimmery glittery goodness.  This is two coats with a top coat of Essie Good To Go. 


These pictures really don't do the polish justice!  I couldn't stop staring at my nails while I had this on, turning them different ways and watching the shimmer change from red to gold to green.  Just beautiful.  And such a bargain too!  *happy dance*

25 July 2012

Glitter Gradient

Evening!

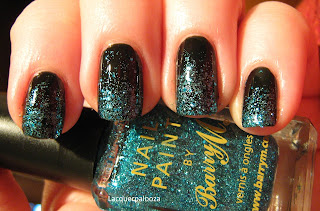
Today I have my first attempt at a glitter gradient!!  I think I need a bit of practice with this technique, this ended up a bit uneven!


For this look I started off with a coat of OPI Nail Envy followed by two coats of Rimmel Black Cab.  Then using small pieces of a makeup sponge, I applied Barry M Aqua Glitter.


For my first attempt, I don't think this is too bad!!  I'm going to have fun practising though :)

22 July 2012

Half 'n' Half

After wanting them for aaaages, I finally bought some silver studs from the Born Pretty Store.  This is my first time using them and I looooove them! 

I started off with two coats of Barry M Mint Green.  Then using a striping brush I painted half of each nail with Barry M Teal.


Once this had dried, I placed the studs on one at a time by dotting some clear polish onto my nail with a small paintbrush, then picking up and pressing the stud into the polish with a toothpick which I made sticky by dipping in clear polish. 


I topped it all off with a coat of Essie Good To Go. 


My top coat ended up a tad bubbly around some of the studs, I think because I put quite a thick coat on to seal everything in.  I'll probably try a couple of thin coats next time. 

As well as these silver studs, I got some gold studs and square gold studs and I'm so looking forward to using them!!

15 July 2012

Smell My Finger....nails


Hi!

Quick post today!  This is a scented polish from Revlon, Watermelon Fizz.  This is two coats of Watermelon Fizz over two coats of ELF Passion Pink, with a top coat of Essie Good To Go.


I was actually surprised at how much this smelled of watermelon!  That aside this is a gorgeous polish.  Could easily have left it at one coat, but I needed a bit more shimmer :)


9 July 2012

An Impromptu Snack...

Evening!

Today I have my first glitter sandwich!  When I sat down to do my nails I had intended to try some gradient nails, but when that went to hell I decided on this mani instead! 


I started out with two coats of Barry M Mint Green.  Then I added a generous coat of Technic Carnival, another (thin) coat of Mint Green and finished off with a coat of Essie Good To Go. 


Et voila!!  My first glitter sandwich.  I'm really pleased with how this turned out :)

I'm ending with a close up of Carnival so you can see the Glittery Goodness up close :D I LOVE this polish.   As you can see from the pic it's a clear base with almost every size and colour of glitter you can imagine.  And it's sooo easy to apply!!  This is such a fun polish to wear - the name sums it up perfectly.


Drool.

4 July 2012

Cracking Up

Hi!

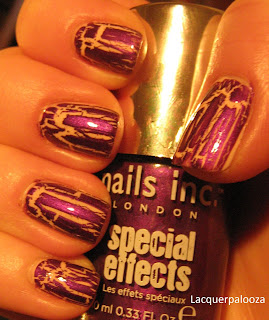
More Nails Inc. this evening!  I seem to be developing a theme!  So, crackle top coats, I love 'em.  I think you can create really cool looking nails with relative ease.  Especially now there's such a variety, the colour combinations are endless :)

This crackle top coat was another of the Nails Inc. lucky dip


I started off with two coats of Nails Inc. Fitzrovia, a gorgeous pale pink with hot pink shimmer.  Then I layered on a coat of Nails Inc. Hoxton crackle top coat, and finished off with a coat of Essie Good To Go.


I love this colour combo :)  This crackle polish was so easy to use, cracking formula as always from Nails Inc. (pardon the pun!).

So, pictures of the right hand! Would you believe they came out better than my left hand?! I think it was probably because I wasn't as careful and painted on a thicker coat than I did on my left hand which ended up looking better.  Mental note made for next time!

27 June 2012

Prince Albert Road

Evening!

Today's polish is another from my Nails Inc. Lucky Dip.  Prince Albert Road is a gorgeous glittery purple.  This was so hard to photograph!! My camera was convinced this polish was blue, but after a LOT of changing lighting and camera settings, these pics are as near to real life as I can manage.  I still think the polish is a tad more purply in real life though. 


This is two coats of Prince Albert and a top coat of Essie Good To Go.


Application was a doddle, and was almost a one-coater.  Clean up was a pain though, as with all glittery polishes, but worth the effort I reckon :)

25 June 2012

St. Pancras

Hi!

A couple of weeks ago I had an email from Nails Inc. with a 'lucky dip' offer - six of their full sized nail polishes for £15.  The only catch was that I couldn't choose the colours, but how could I refuse?!  As it turns out all six polishes were gorgeous, so I got lucky :)

So, here is one of those polishes...


St. Pancras is a gorgeous blood red.  As is usually the case with Nails Inc. polishes, application was easy. 


This is two coats of St. Pancras with a top coat of Essie Good To Go.

22 June 2012

Totally Teal?

Evening!

I hadn't intended to leave so long between posts, but a long weekend away and a computer virus have rendered me out of action for a while!!

So, today is a simple swatch of No. 7 Totally Teal. 


This is two coats of Totally Teal and a top coat of Essie Good To Go.


I love this colour, although I think I'd say it's leaning more toward a dark-ish green than teal....Anyway, I do love No. 7 polishes, especially the brushes which are quite wide and flat and slightly rounded.  Takes a bit of getting used to but I like it :)

13 June 2012

Black and Blue (and silver)...

My first post!  Actually feel quite nervous...!

So.  This mani is my first time using striping tape.  I haven't really seen it used in many manicures but thought I would give it a go...


I started off with two coats of OPI Nail Envy (which, by the way, is awesome) and then two coats of Barry M Cobalt Blue.  Then I placed a stripe of black and a stripe of silver just off the centre of my nails and finished it off with a coat of Nails Inc. Albert Bridge top coat. 


I was pleasantly surprised at how easy the striping tape was to use.  It's a little fiddly, and I had a bit of trouble snipping the ends neatly (apologies for the ring finger!) but I don't think this is too bad for my first go!

I also apologise for the pictures - still learning how to take decent pictures of my nails, so bear with me! :)

11 June 2012

Welcome!

Hi!  I'm Jacqueline, welcome to my blog!


I decided to start this blog after following a few other nail blogs for a while, and thought this would be a great way to share my love of all things 'nails'!


I'm quite new to nail art so I'm still learning, but am having a lot of fun doing it :)


Hope you enjoy!